
This Page contains affiliate links.Read the full Disclosure here

Sarva Pindi can be made in few different ways. Made in a Kadai, it shapes up like a bowl. Also made on fry pan ( In fact a special iron Roti pan called Rottela Penam, It is then called 'Karapu Rotte' means Spicy Roti. Cooking in different vessels gives different textures but overall taste is similar.
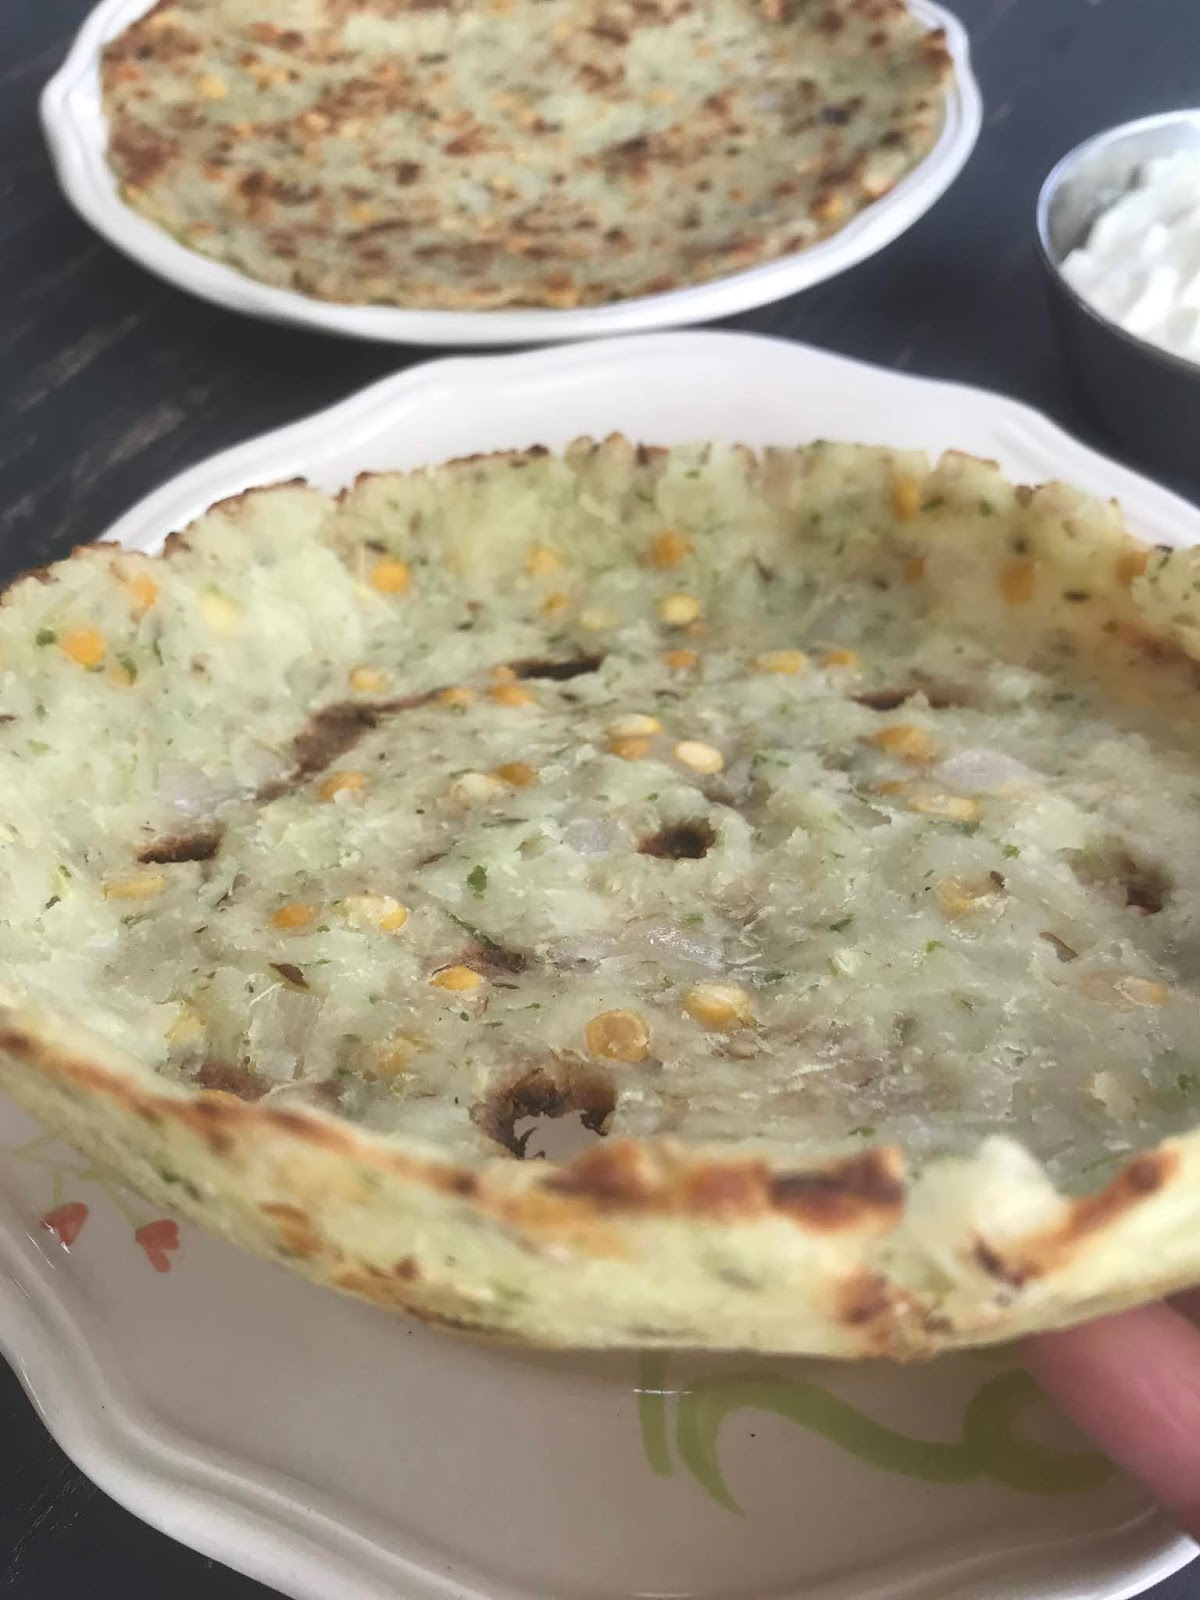
The Kadai Roti has a crispy bottom with a soft top layer and spicy and is usually served with Yogurt and Pickle on the side. The Kadai will be covered while cooking to achieve the texture.The fry pan Roti is my favorite and crispy, soft at same time.To enhance taste I'm adding grated bottle gourd to the recipe.

If you like Roti to be crispy you have to press Roti thinner and pressing it thicker results in softer Roti.Also using more oil makes it crispy n very tasty.Me n my son loves crispy and husband loves it thicker. Even though I dread to use more oil, for my son I use oil generously n for me moderately.

Servings:
Four (4)
Total time:
45 minutes
Ingredients: (I use US standard measuring; 1cup=8oz=250ml)
- 2 cup Rice flour
- 1 cup tightly packed grated bottle gourd
- 1.5 tsp Cumin seeds
- 1 tbsp sesame seeds
- 3-4 sprigs of curry leaves
- 8-10 Thai chillies/ 4 serrano chillies or adjust
- Salt to taste (I used 1.5 tsp)
- 1/4 cup Chana dal ( Split Bengalgram/ Senagapappu)
- 1 onion
- 1 Tbsp ginger garlic paste
Sarva Pindi/Ginne Appa Recipe
- Soak Chana Dal ( Senagapappu) in a bowl for 20 minutes. Use warm water to fasten the process.
- Chop onions to medium size cubes and keep aside. Chop green chillies into medium size pieces.
- Take a wide bowl and measure rice flour into it.
- Add 1 cup finely grated bottle gourd to it. I grated with cheese grater.
- Add Cumin seeds, Sesame seeds, Curry leaves, salt to it. If you have ginger garlic paste add it.
- Now blend together green chillies, ginger garlic ( if you do not have paste) and make a paste. To the paste add onion pieces and pulse the jar few times. We want onions to be coarse and want to see little pieces of em but not a smooth paste.
- Add this mixture to the Flour.
- Now add soaked Chana dal to it.
- Now mix the flour with hands to mix all ingredients well.
- Now add water gradually and make a dough. The dough should be little soft but not too soft.When you press with hand it should move easily.
- Now take a big piece if dough, flatten it like a disc.
Sarva pindi in Kadai/Skillet :

- Take a kadai and spread with teaspoon oil. I used my Cast Iron Skillet
for this. Cast iron gives a nice and crispy Roti.
- New Update : I bought Lodg Cast Iron Wok
and started making Sarvapindi in this. It's totally worth it. Iron Kadai is good for health. Especially for anaemic people. I threw away all my other Kadais after buying this. I use this for making curries, stir frys, deep frys and what not. More over it will never turn ugly like allumininum Kadai.Cleaning is easy.This one is a keeper. It's my everyday wok. I keep this wok and the Lodge Cast Iron Pan
and work parallel with both.By the time one roti is done, other one is cool to touch to make one more Roti. I own the small pan due to it's weight. If its not a big deal suggest to buy 12 inch pan with double handle as it's perfect. With Iron Kadai you get even better, tastier Roti.
- Take Dough and place in the center of the Kadai/skillet. Start pressing with the back of your palm in all directions to spread it. Tilt Kadai lil bit to make it easy.Wet your palm in between to prevent dough sticking to your hand. Try a small Appa if its your first time.

- Try to press evenly to ensure even cooking.
- Make holes all around and in the center.
- Now heat the stove to medium high.
- Place skillet on the stove and top it with a tablespoon oil. Move pan to spread oil all around.
- Cover the skillet and cook till bottom is browned.
- Add more oil if needed. My mom uses generous amounts of oil and her Rotis are soooo tasty. I have no problem eating em But When I make em I dread to use more oil. So use oil as per your preference.
- When bottom is browned, lift it with a spoon all around and take it on to a plate.
- You can flip roti in the Kadai and leave it for couple minutes to make it extra crunchy. This step is optional.
- To make another Roti, let pan cool down or keep another skillet handy.
- Now enjoy Sarva Pindi with Yogurt and if you like spicy, with Pickle.


Sarva pindi on fry pan:


- Take a wet cloth and place a ball of dough on top. You can place cloth on cutting board or on counter top. I placed it on Marble platform.

- Start pressing with the back of your palm in all directions to spread it.Wet your palm in between to prevent dough sticking to your hand. Try a small Appa if its your first time.Press evenly.
- Now heat the stove to medium high.
- Place Cast Iron pan
on the stove and top it with a tablespoon oil. Spread oil with Silicone Pastry Brush
.
- Now put the wet cloth with pressed Roti on pan with Roti facing down on pan. Remove cloth.

- Add tsp oil on top. Add more for crispy roti.
- Flip once bottom looks cooked.
- Flip back and forth until both sides are nice and brown.
- Repeat to make more Roti.
- Enjoy with Pickle and yogurt.


Do try more famous Telangana recipes from my blog:


0 comments :
Post a Comment